[Effective Java] Day 14 - Item 9, 10 :: try-finally 보다는 try-with-resources를 사용하라, equals는 일반 규약을 지켜 재정의하라
Day14에서는 item 9, 10에 대한 내용을 다룬다.
Item 9 :: try-finally 보다는 try-with-resources를 사용하라
File Reader / DB Connection 등의 자원을 사용할 때, 사용이 끝나면 반드시 해당 자원을 닫아주어야한다. 왜냐하면 적절히 닫지 않을 경우 다양한 이슈가 발생할 수 있기 때문이다.
자원을 닫아줄 수 있는 방법은 try-finally와 try-with-resources가 있다. 권장되는 방법은 try-with-resources 이다.
try-with-resources 방식의 장점을 통해 살펴보도록 하자.
장점 1. 코드가 간결하다.
Try-Finally 사용
static void copy(String src, String dst) throws IOException {
    InputStream in = new FileInputStream(src);
    try {
        OutputStream out = new FileOutputStream(dst);
        try {
            byte[] buf = new byte[BUFFER_SIZE];
            int n;
            while ((n = in.read(buf)) >= 0)
                out.write(buf, 0, n);
        } finally {
            out.close();
        }
    } finally {
        in.close();
    }
}
Try-with-Resources 사용
static void copy(String src, String dst) throws IOException {
    try (InputStream in = new FileInputStream(src);
            OutputStream out = new FileOutputStream(dst)) {
        byte[] buf = new byte[BUFFER_SIZE];
        int n;
        while ((n = in.read(buf)) >= 0)
            out.write(buf, 0, n);
    }
}
Try-Finally와 비교 했을 때
- 짧고 읽기 수월하다
- 어떤 자원을 사용하고 있는지 명시적으로 알기가 쉬워졌다.
- 자원을 회수하는 코드가 없다.
- try-with-resources를 사용하기 위해서는 쓰려는 자원이 AutoCloseable 인터페이스를 구현해야 한다.
- 위 예제소스코드에서도 InputStream과 OutputStream이 둘 다 AutoCloseable을 구현하고 있다.
- AutoCloseable 인터페이스의 close
- try-with-resources를 사용하기 위해서는 쓰려는 자원이 AutoCloseable 인터페이스를 구현해야 한다.
AutoCloseable을 이용한 자원 회수
AutoCloseable 인터페이스의 close() 메서드를 구현하면, try문이 끝날 때 각 자원의 close 메서드를 호출하여 자원을 회수한다.
FileInputStream의 소스를 따라가보면 최종적으로 Autoclosable을 implements함을 알 수 있다.
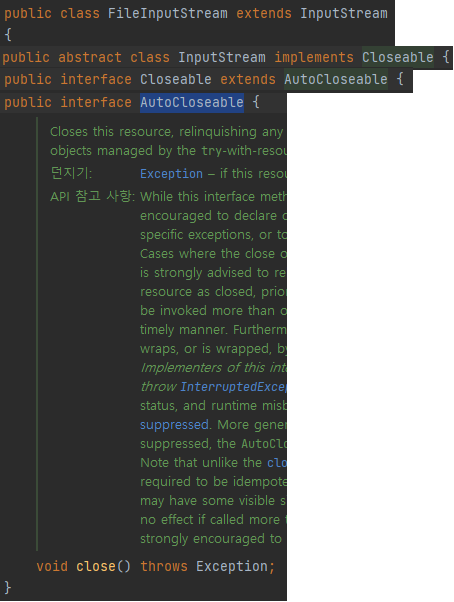
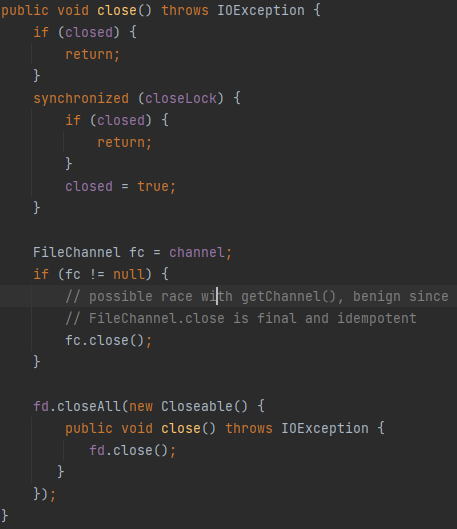
- FileInputStream에 구현된 close 메서드
장점 2. 예외 상황에서 문제 파악이 쉽다.
public class ResourceTest {
    public void tryFinally(){
        System.out.println("### Try Finally 테스트 시작 ###");
        try{
            MyCustomResource resource = new MyCustomResource();
            resource.dosomething(); //statctrace에서 지목한 line
        }finally {
            System.out.println("Finally 안에 들어왔습니다.");
            throw new RuntimeException();
        }
    }

    public void tryWithResource() throws Exception{
        System.out.println("### Try Finally 테스트 시작 ###");
        try(MyCustomResource resource = new MyCustomResource()){
            resource.dosomething(); //statctrace에서 지목한 line
        }
    }

    public static class MyCustomResource implements AutoCloseable {
        public void close() throws Exception{
            System.out.println("close 메서드에 들어옴");
            double x = 1/0;
            System.out.println("close 메서드가 끝까지 실행됨");
        }
        public void dosomething(){
            throw new RuntimeException();
        }
    }
}
위의 예시 코드에서 아래와 같이 tryFinally()를 실행해보자
class Client {
    public static void main(String[] args) {
        ResourceTest rs = new ResourceTest();
        rs.tryFinally();
    }
}
- tryFinally 실행결과
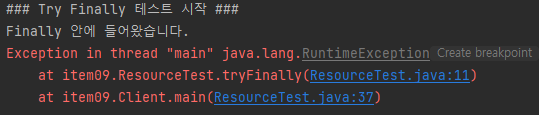
try안에서 발생한 resource.dosomething()의 Exception은 무시되고 finally에 있는 RuntimeException에 대한 내용만 나온다. 그럼 tryWithResource()를 실행하면 어떻게 될까?
- tryWithResource 실행결과
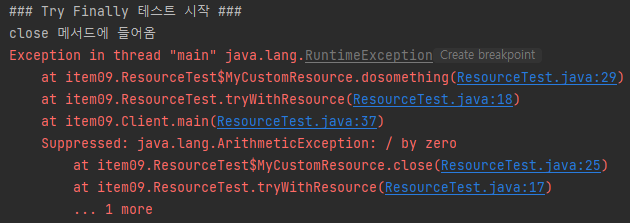
try안에서 발생한 resource.dosomething()의 Exception이 정상 출력되어 문제파악이 쉽다.
또한 자원을 회수하면서 close()메서드 수행 중 발생한 suppressed도 같이 출력된다.
- suprressed
프로그래머에게 보여줄 예외 하나만 보존되고 여러 개의 다른 예외가 숨겨질 수도 있다. 이렇게 숨겨진 예외들도 그냥 버려지지는 않고, 스택 추적 내역에 숨겨졌다(suppressed)라는 꼬리표를 달고 출력된다.
장점 3. 문제 발생 소지가 적다
public class jdbcTest {
    public void JDBCExam() throws Exception {
        Connection conn = null;
        PreparedStatement pstmt = null;
        ResultSet rs = null;

        String driverName = "oracle.jdbc.driver.OracleDriver";
        String url = "oracle:thin:localhost:1521:ORCL";
        String user = "scott";
        String password = "tiger";

        try {
            Class.forName(driverName);
            conn = DriverManager.getConnection(url, user, password);
            pstmt = conn.prepareStatement("select ....");
            rs = pstmt.executeQuery();
            while (rs.next()){}
        } catch (ClassNotFoundException e) {
            System.out.println("[로드 오류]\n" + e.getStackTrace());
        } catch (SQLException e) {
            System.out.println("[연결 오류]\n" + e.getStackTrace());
        } finally {
            try {
                if (conn != null) {
                    conn.close();
                }
                if (pstmt != null) {
                    pstmt.close();
                }
                if (rs != null) {
                    rs.close();
                }
            } catch (SQLException e) {
                System.out.println("[닫기 오류]\n" + e.getStackTrace());
            }
        }
    }
}
conn, pstmt, conn을 역순으로 빠짐없이 close하고 각각의 자원을 닫을 때 Exception catch해야한다. 만약, close를 깜빡하거나 Exception처리를 하지 않으면
- connection 자원이 반환되지 않고
- 리소스 풀이 바닥나고
- 새로운 요청 시 줄 수 있는 connection이 없다.
이런 경우 아래와 같이 Try-with-Resource를 사용한다면
public class jdbcTest2 {
    public void JDBCExam() throws Exception {
        String driverName = "oracle.jdbc.driver.OracleDriver";
        String url = "oracle:thin:localhost:1521:ORCL";
        String user = "scott";
        String password = "tiger";

        try(Connection conn=DriverManager.getConnection(url, user, password);
            PreparedStatement pstmt =conn.prepareStatement("select ....");
            ResultSet rs = pstmt.executeQuery()
            ){
            Class.forName(driverName);
            while (rs.next()){}
        } catch (ClassNotFoundException e) {
            System.out.println("[로드 오류]\n" + e.getStackTrace());
        } catch (SQLException e) {
            System.out.println("[연결 오류]\n" + e.getStackTrace());
        }
    }
}
- try() 안에 선언한 자원을 자동 역순으로 모두 close 한다.
- 앞서 close 되고 있는 자원으로 인하여 Exception이 발생해도, 다음 자원의 close method는 정상적으로 실행된다.
따라서 try-finally 대신 try-with-resources를 사용하면 실수 할 수 없는 코드가 된다.
Item 10 :: equals는 일반 규약을 지켜 재정의하라
다음 중 하나에 해당한다면 equals를 재정의하지 않는 것이 최선이다.
- 각 인스턴스가 본질적으로 고유하다.
- Ex) Thread
- 인스턴스의 ‘논리적 동치성(logical equality)’을 검사할 일은 없다.
- Ex) Pattern
equals를 재정의하여 두 Pattern의 인스턴스가 같은 정규 표현식을 나타내는지 논리적 동치성에 대해 검사하는 방법이 있긴하다.
하지만 필요하지 않다고 판단된다면 object의 기본 equals만으로도 해결된다. 실제로도 Pattern은 equals를 재정의하지 않았다.public class RegexExample { public static void main(String[] args) { String pattern = "^[0-9]*$"; //숫자만 String val = "123456789"; //대상문자열 boolean regex = Pattern.matches(pattern, val); System.out.println(regex); } }
- Ex) Pattern
- 상위 클래스에서 재정의한 equals가 하위 클래스에도 딱 들어맞는다.
- List, Set, Map - AbstractList, AbstractSet, AbstractMap의 equals 상속받아 사용한다.
- 클래스가 private이거나 package-private이고 equals 메서드를 호출할 일이 없다.
재정의를 해야 될때는 언제일까?
객체 식별성이 아니라 (object identity 두 객체가 물리적으로 같은가) 논리적 동치성을 확인해야 하는데, 상위 클래스의equals가 논리적 동치성을 비교하도록 재정의되지 않았을 때다. 주로 값클래스들이 (Integer, String) 해당된다. 객체가 같은 지가 아니라 값이 같은지가 궁금할 것이다. 논리적 동치성을 판단하도록 재정의하면, 인스턴스 값을 비교도 할 뿐만 아니라 Map의 키와 Set의 원소로 쓸 수 있다.
equals 메서드 재정의시 지켜야할 규약
- 반사성 reflexibility
- 대칭성 symmetry
- 추이성 transitivity
- 일관성 consistency
- null-아님
x.equals(x)
x.equals(y) y.equals(x)
x.equals(y) y.equals(z) x.equals(z)
x.equals(y) 반복호출
x.equals(null)
세상에 홀로 존재하는 클래스는 없다. 한 클래스의 인스턴스는 다른 곳으로 빈번히 전달된다. 그리고 컬렉션 클래스들을 포함해 수많은 클래스는 전달받은 객체가 equals 규약을 지킨다고 가정하고 동작한다.
동치관계를 만족시키기 위한 다섯 요건을 하나씩 살펴보자.
동치관계 = 집합을 서로같은원소들로 이뤄진 부분집합(동치류, equivalence class)으로 나누는 연산. equals 메서드가 쓸모 있으려면 모든 원소가 같은 동치류에 속한 어떤 원소와도 서로 교환할 수 있어야 한다.
public class Member {
    private String name;
    private String address;

    public Member(String name, String address) {
        this.name = name;
        this.address = address;
    }

    public static void main(String[] args) {
        // 동치 비교(equivalence) vs 동일성 비교(identity)
        Member member1 = new Member("ko", "seoul");
        Member member2 = new Member("ko", "seoul");

        System.out.println(member1 == member2); //동치비교 - false
        System.out.println(member1.equals(member2)); //동일성 비교 - false. equals 재 정의하여 true로 만들어야 함.

//1 reflexibility
        System.out.println(member1.equals(member1));

//2 symmetry
        System.out.println(member1.equals(member2));
        System.out.println(member2.equals(member1));

//3 transitivity
        Member member3 = new Member("ko","seoul");
        System.out.println(member1.equals(member2));
        System.out.println(member2.equals(member3));
        System.out.println(member1.equals(member3));

//4 consistency
        System.out.println(member1.equals(member3));
        System.out.println(member1.equals(member3));
        System.out.println(member1.equals(member3));
    }
}
반사성 reflexibility
객체는 자기 자신과 같아야 함. 이 요건은 일부러 어기는 경우가 아니라면 만족시키지 못하기 더 어렵다.
대칭성 symmetry
위배 사례를 보자.
- 대소문자를 구별하지 않는 문자열을 구현한 클래스
// 코드 10-1 잘못된 코드 - 대칭성 위배! (54-55쪽)
public final class CaseInsensitiveString {
  private final String s;

  public CaseInsensitiveString(String s) {
      this.s = Objects.requireNonNull(s);
  }

  // 대칭성 위배!
  @Override public boolean equals(Object o) {
      if (o instanceof CaseInsensitiveString)
          return s.equalsIgnoreCase(
                  ((CaseInsensitiveString) o).s);
      if (o instanceof String)  // 한 방향으로만 작동한다!
          return s.equalsIgnoreCase((String) o);
      return false;
  }

  // 문제 시연 (55쪽)
  public static void main(String[] args) {
      CaseInsensitiveString cis = new CaseInsensitiveString("Polish");
      String s = "polish";

      List<CaseInsensitiveString> list = new ArrayList<>();
      list.add(cis);

      System.out.println(cis.equals(s));      //true
      System.out.println(s.equals(cis));      //false
      System.out.println(list.contains(s));   //false
  }

  // 수정한 equals 메서드 (56쪽)
//    @Override public boolean equals(Object o) {
//        return o instanceof CaseInsensitiveString &&
//                ((CaseInsensitiveString) o).s.equalsIgnoreCase(s);
//    }
}
String의 equals는 CaseInsentiveString의 존재를 모른다. 따라서 s.equals(cis)는 false를 반환하여 대칭성을 명백히 위반한다.
또, cis를 arraylist에 넣어 객체를 생성한다. 그 다음 list.contatins(s)를를 수행하면 false를 반환하기는 한다. 하지만 jdk버전이 바뀌거나 다른 JDK에서 수행하는 경우 true를 반환할 수 있다.
equals 규악을 어기면 그 객체를 사용하는 다른 객체들이 어떻게 반응할지 알 수 없다.
즉 CaseInsensitiveString의 equals는 String과 연동이 불가하다.
추이성 transitivity
Color enum 생성 -> Point 부모 -> ColorPoint 자식
- 1.대칭성 위배 예시
public enum Color {
    RED, GREEN, BLACK
}

public class Point {
    private final int x;
    private final int y;

    public Point(int x, int y) {
        this.x = x;
        this.y = y;
    }

    @Override
    public boolean equals(Object o) {
        if (!(o instanceof Point)) return false; //상속관계에서 instanceof 비교 사용
        Point point = (Point) o;
        return x == point.x && y == point.y;
    }
}

public class ColorPoint extends Point {
    private final Color color;

    public ColorPoint(int x, int y, Color color) {
        super(x, y);
        this.color = color;
    }

    @Override public boolean equals(Object o) {
        if (!(o instanceof ColorPoint))
            return false;
        return super.equals(o) && ((ColorPoint) o).color == color;
    }

    public static void main(String[] args) {
        // 첫 번째 equals 메서드(코드 10-2)는 대칭성을 위배한다. (57쪽)
        Point p = new Point(1, 2);
        ColorPoint cp = new ColorPoint(1, 2, Color.RED);

        System.out.println(p.equals(cp) + " " + cp.equals(p)); // true  false
    }
}
- 2.대칭성은 맞지만, 추이성 위배 예시
public class Point {
    private final int x;
    private final int y;

    public Point(int x, int y) {
        this.x = x;
        this.y = y;
    }

    @Override
    public boolean equals(Object o) {
        if (!(o instanceof Point)) return false; //상속관계에서 instanceof 비교 사용
        Point point = (Point) o;
        return x == point.x && y == point.y;
    }
}

public class ColorPoint extends Point {
    private final Color color;

    public ColorPoint(int x, int y, Color color) {
        super(x, y);
        this.color = color;
    }

    // 코드 10-3 잘못된 코드 - 추이성 위배! (57쪽)
    @Override public boolean equals(Object o) {
        if (!(o instanceof Point))
            return false;

        // o가 일반 Point면 색상을 무시하고 비교한다.
        if (!(o instanceof ColorPoint))
            return o.equals(this);  // 대칭성 만족

        // o가 ColorPoint면 색상까지 비교한다.
        return super.equals(o) && ((ColorPoint) o).color == color;
    }

    public static void main(String[] args) {
        // 두 번째 equals 메서드(코드 10-3)는 추이성을 위배한다. (57쪽)
        ColorPoint p1 = new ColorPoint(1, 2, Color.RED);
        Point p2 = new Point(1, 2);
        ColorPoint p3 = new ColorPoint(1, 2, Color.BLUE);

        System.out.printf("%s %s %s%n",
                p1.equals(p2), p2.equals(p3), p1.equals(p3)); //true true false
    }
}
또다른 하위클래스 있을시, 재귀 위험도 있을 수 있다.
public class SmellPoint extends Point{
    private final String name;

    public SmellPoint(int x, int y, String name) {
        super(x, y);
        this.name = name;
    }

    @Override public boolean equals(Object o) {
        if(!(o instanceof Point))
            return false;

        if (!(o instanceof SmellPoint))
            return o.equals(this);
        return super.equals(o) && ((SmellPoint) o).name.equals(name);
    }
}

public static void main(String[] args) {
    Point point = new Point(1, 2);
    Point colorPoint = new ColorPoint(1, 2, Color.GREEN);
    Point smellPoint = new SmellPoint(1,2,"Larry");

    System.out.println(point.equals(colorPoint)); //true
    System.out.println(point.equals(smellPoint)); //true
    System.out.println(colorPoint.equals(smellPoint)); //무한재귀 StackOverflowError
}
해결 방법은 무엇일까?
구체 클래스를 확장해 새로운 값을 추가하면서 equals 규약을 만족시킬 방법은 존재하지 않는다. 객체 지향적 추상화의 이점을 포기하지 않는 한은 말이다. 이 말은 얼핏, equals 안의 instanceof 검사를 getClass 검사로 바꾸면 규약도 지키고 값도 추가하면서 구체 클래스를 상속할 수 있다는 뜻으로 들린다. (아래)
// 잘못된 코드 - 리스코프 치환 원칙 위배! (59쪽)
@Override public boolean equals(Object o) {
    if (o == null || o.getClass() != getClass())
        return false;
    Point p = (Point) o;
    return p.x == x && p.y == y;
}
하지만 실제 활용할 수는 없다. 예를 들어 Point의 equals를 위와 같이 getClass기반으로 구현한 상태일 때, 주어진 점이 (반지름이 1인) 단위 원 안에 있는지를 판별하는 메서드가 필요하다고 해보자.
// 단위 원의 모든 점을 포함하도록 unitCircle을 초기화
// CounterPointTest 클래스
public class CounterPointTest {
    private static final Set<Point> unitCircle =
            Set.of(new Point(1,0),new Point(0,1),new Point(-1,0),new Point(0,-1));

    public static boolean onUnitCircle(Point p){
        return unitCircle.contains(p);
    }

    public static void main(String[] args) {
        CounterPoint counterPoint = new CounterPoint(1,0);
        System.out.println(onUnitCircle(counterPoint)); //false
        //Set을 포함하여 대부분의 컬렉션은 contains 작업에 equals 메서드를 이용하는데,
        // CounterPoint의 인스턴스는 어떤 Point와도 같을 수 없기 때문이다.
    }
}
public class CounterPoint extends Point {
    private static final AtomicInteger counter =
            new AtomicInteger();
    public CounterPoint(int x, int y) {
        super(x, y);
        counter.incrementAndGet();
    }
    public static int numberCreated() { return counter.get(); }
}
리스코프 치환 원칙에 따르면, Point의 하위 클래스는 정의상 여전히 Point이므로 어디서든 Point로써 활용될 수 있어야 한다. 그러나 CounterPoint의 인스턴스를 onUnitCircle 메서드에 넘기면 어떻게 될까? false를 반환한다.
Set을 포함하여 대부분의 컬렉션은 contains 작업에 equals 메서드를 이용하는데, CounterPoint의 인스턴스는 어떤 Point와도 같을 수 없기 때문이다.
구체 클래스의 하위 클래스에서 값을 추가할 방법은 없지만 괜찮은 우회 방법으로 equals 규약 위배없이 합성을 사용하는 방법이 있다. Point를 상속하는 대신 Point를 Color Point의 private 필드로, ColorPoint와 같은 위치의 일반 Point를 반환하는 뷰(view) 메서드를 public으로 추가하면 된다.
// 코드 10-5 equals 규약을 지키면서 값 추가하기 (60쪽)
// equals 규약 위배 없이 합성 사용
public class ColorPoint {
    private final Point point;
    private final Color color;

    public ColorPoint(int x, int y, Color color) {
        point = new Point(x, y);
        this.color = Objects.requireNonNull(color);
    }

    //이 ColorPoint의 Point 뷰를 반환한다.
    public Point asPoint() {
        return point;
    }

    @Override public boolean equals(Object o) {
        if (!(o instanceof ColorPoint))
            return false;
        ColorPoint cp = (ColorPoint) o;
        return cp.point.equals(point) && cp.color.equals(color);
    }

    @Override public int hashCode() {
        return 31 * point.hashCode() + color.hashCode();
    }

    public static void main(String[] args) {
        // 첫 번째 equals 메서드(코드 10-2)는 대칭성을 위배한다. (57쪽) - 해결
        Point p = new Point(1, 2);
        ColorPoint cp = new ColorPoint(1, 2, Color.RED);
        System.out.println(p.equals(cp) + " " + cp.equals(p)); // false false

        // 두 번째 equals 메서드(코드 10-3)는 추이성을 위배한다. (57쪽) - 해결
        ColorPoint p1 = new ColorPoint(1, 2, Color.RED);
        Point p2 = new Point(1, 2);
        ColorPoint p3 = new ColorPoint(1, 2, Color.BLUE);
        System.out.printf("%s %s %s%n",
                p1.equals(p2), p2.equals(p3), p1.equals(p3)); // false false false
    }
}
자바 라이브러리에도 구체 클래스를 확장해 값을 추가한 클래스가 종종 있다. Timestamp는 Date를 확장한 후 nanoseconds 필드를 추가했다. 그 결과로 Timestamp의 equals는 대칭성을 위배하며, Date 객체와 한 컬렉션에 넣거나 서로 섞어 사용하면 엉뚱하게 동작할 수 있다. Timestamp를 이렇게 설계한 것은 실수니 절대 따라 해서는 안된다.
Timestamp stamp = new Timestamp(System.currentTimeMillis());
Date date = new Date(stamp.getTime());
System.out.println(stamp.equals(date));//false
System.out.println(date.equals(stamp));//true
일관성 consistency
두 객체가 같다면 (어느 하나 혹은 두 객체 모두가 수정되지 않는 한) 앞으로도 영원히 같아야 한다는 뜻이다.
클래스가 불변이든 가변이든 equals의 판단에 신뢰할 수 없는 자원이 끼어들게 해서는 안 된다. 이 제약을 어기면 일관성 조건을 만족시키기가 아주 어렵다. 예컨대 java.net.URL의 equals는 URL과 IP 주소를 이용해 비교한다
URL url1 = new URL("www.naver.com");
URL url2 = new URL("www.naver.com");
url1.equals(url2); //true

//비즈니스 로직 수행 후 다시 같은 주소로 url 객체를 생성하여 비교하면 다른 결과가 나올 수 있다.

url2 = new URL("www.naver.com");
url1.equals(url2); //false
URL을 저렇게 만든건 실수였으니 절대 따라 해서는 안 된다. 이런 문제를 피하려면 equals는 항시 메모리에 존재하는 객체만을 사용한 결정적(deterministic) 계산만 수행해야 한다.
null-아님
모든 객체가 null과 같지 않아야 한다는 뜻이다.
// 명시적 널 검사 - 필요없다!
@Override public boolean equals(Object o) {
    if (o == null)
        return false;
    ...
}

// 묵시적 널 검사 - 이게 낫다.
@Override public boolean equals(Object o) {
    if (!(o instanceof MyType)) // 널이면 false 반환
        return false;
    MyType mt = (MyType) o;
    ...
}
묵시적 null 검사의 경우 입력이 null이면 타입 확인 단계에서 false를 반환하기 때문에 null 검사를 명시적으로 하지 않아도 된다.
결론: 양질의 equals 메서드 구현방법
- == 연산자를 사용해 입력이 자기 자신의 참조인지 확인한다.
- instanceof 연산자로 입력이 올바른 타입인지 확인한다.
- 입력을 올바른 타입으로 형변환한다.
- 입력 객체와 자기 자신의 대응되는 ‘핵심 ‘필드들이 모두 일치하는지 하나씩 검사한다.
- 구글에서 만든 @AutoValue을 이용해서 equals와 hashcode를 자동으로 재정의해보자 (Lombok의 @EqualsAndHashCode도 있다.)
public final class PhoneNumber {
    private final short areaCode, prefix, lineNum;
    public PhoneNumber(int areaCode, int prefix, int lineNum) {
        this.areaCode = rangeCheck(areaCode, 999, "area code");
        this.prefix = rangeCheck(prefix, 999, "prefix");
        this.lineNum = rangeCheck(lineNum, 9999, "line num");
    }
    private static short rangeCheck(int val, int max, String arg) {
        if (val < 0 || val > max)
            throw new IllegalArgumentException(arg + ": " + val);
        return (short) val;
    }
    @Override public boolean equals(Object o) {
        if (o == this) // 1 자기 자신의 참조인지 확인
            return true;
        if (!(o instanceof PhoneNumber)) // 2 올바른 타입인지 확인
            return false;
        PhoneNumber pn = (PhoneNumber)o; // 3 올바른 타입으로 형변환, instanceof가 성공했으면 이것은 100퍼센트!
        return pn.lineNum == lineNum && pn.prefix == prefix
            && pn.areaCode == areaCode; // 4 핵심 필드들이 일치하는지 검사
    }
    ... // Remainder omitted
}